
Topic 08: Arduino Control with Processing
Here, the previous topics will be put together in the form of a simple project. The goal is to have a key-press on a computer keyboard control the movement of a servo motor attached to the Arduino Uno. To do this the 'u' (up) and 'd' (down) keyboard keys will be used. In addition, we'd like to have an animated graphic on a Processing canvas display the movement of the servo motor as the actual servo motor is moving. We'll also add some color changes in the animated graphic in the canvas as the servo motor moves. So, we'll need a Processing sketch which responds to the keyboard keys and sends the commands to Arduino over the serial port to move the servo motor as well as displaying the graphic on the canvas. In addition, we'll need an Arduino sketch that will be waiting for serial commands from the computer to move the servo motor and which will then move the servo motor according to the angle sent to the Arduino.
The video below shows the final project in action. On the left is the Processing canvas showing the animated graphic of the servo motor movement with the color changing as the servo motor moves. On the right is the simultaneously recorded webcam video of the servo motor connected to the Arduino Uno with the servo motor moving in response to the computer keyboard presses. Note that the live webcam image is not part of this Processing project, although that said, it is very easy to get Processing to display a live webcam feed.
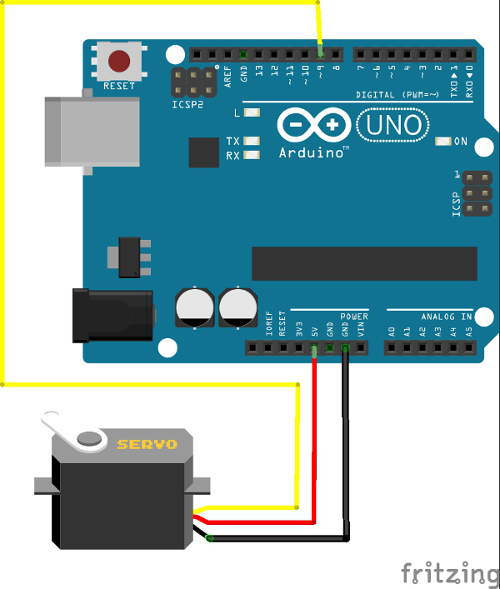
The Arduino Servo Motor Circuit
The image below shows the Fritzing circuit diagram of how the servo motor is connected to the Arduino Uno. The servo motor has three wires. One is for ground (normally a brown or black wire), one is for the 5V power (the orange or red wire) and the third (yellow) is for the pulse width modulation signal (PWM) to control the servo motor angle. This wire gets connected to a PWM digital output pin on Arduino (designated with a ~). In this case, the yellow wire is connected to digital output pin number ~9. The Arduino microcontroller creates the appropriate PWM signal to turn the servo motor. All that is required is for the Arduino sketch to send an angle command to that pin and the Arduino translates the angle and generates the appropriate PWM signal to get the servo to turn it to the designated angle.
The Processing Sketch
The processing sketch is liberally commented, so refer to the comments in the code for explanations of what the code is doing.
// Displays an animated graphic of a servo motor moving up or down
// through 180 degrees in response to a keyboard press
// and send serial commands to the Arduino sketch to move the servo motor

import processing.serial.*;  //import the serial library

//define some variables for the graphic and the movements
int new_angle, this_angle, temp_angle;
int e_rad = 100, e_ctr_x = 250, e_ctr_y = 200;
int l_length = 100;
int r_ctr_x = e_ctr_x, r_ctr_y = e_ctr_y;
color angle_color = 200;

Serial port;   //define a port of the
Serial type

void setup() {
	size(400, 400); //set the canvas size
	new_angle = 90;
	this_angle = 90;
	strokeWeight(15);  //for the graphics objects
	port = new Serial(this, "COM3", 9600);   //connect to the Arduino serial port
}

void draw() {
	background(angle_color, 0, 255);  //clear the canvas
	if (this_angle < new_angle) {
		//println("1) ", new_angle, angle);
		this_angle = this_angle + 5;
	}
	if (this_angle > new_angle) {
		//println("2) ", new_angle, angle);
		this_angle = this_angle - 5;
	}
	angle_color = int((float(this_angle)/180) * 255);
	fill(255, angle_color, 0);
	ellipse(e_ctr_x, e_ctr_y, e_rad, e_rad);
	//calculate the outer point of the lever arm
	int x2 = int(cos(radians(this_angle)) * l_length + e_ctr_x);
	int y2 = int(sin(radians(this_angle)) * l_length + e_ctr_y);
	//println(x2, y2);
	line(e_ctr_x, e_ctr_y, x2, y2);

	// use a conditional statement to write to the serial port so that
	// we are writing to the serial port only when the angle changes
	if (temp_angle != this_angle) {
		port.write(this_angle);  //write the servo angle to the serial port
		temp_angle = this_angle;
		println(this_angle);
	}
}
//function to check for a keyboard key press during the draw loop
void keyPressed(){
	switch(key) {
	case 'd':
		new_angle = 0;
	break;
	case 'u':
		new_angle = 180;
	break;
  }
  //println(new_angle);
}
The Arduino Sketch
// serial_servo
// by Adrian Glasser
// This code is intended to be used in conjunction with
// the Processing code servo_move which sends the servo angle to the
// serial port

#include <Servo.h>

Servo myservo;  // create servo object to control a servo

                // a maximum of eight servo objects can be created

int pos = 0;    // variable to store the servo position
int ServoPin = 9; //identify which pin the servo is connected to
int ServoAngle;  //create a variable

void setup() {
	// start serial port at 9600 bps:
	Serial.begin(9600);
	myservo.attach(ServoPin);  // attaches the servo on pin 9 to the servo object
}

void loop() {
	if (Serial.available() > 0) {
		// read the incoming byte:
		ServoAngle = Serial.read(); //read the angle that was sent from the Processing sketch
		myservo.write(ServoAngle); // move the servo to the new angle
	}
}
Connect a servo motor to digital (~) pin 9 of the Arduino as shown in the circuit diagram above. Upload the Arduino sketch to the Arduino Uno. Once that is done, the sketch starts running on the Arduino. Then run the Processing sketch in Processing. Check to be sure the Processing code is using the same COM port as the Arduino is connected to on your computer. When the Processing sketch runs, that should display the Processing canvas with the graphic on it. Now press the 'u' or the 'd' keys on the computer keyboard and the graphic should animate and the servo motor should move as in the video above. Note that although the graphic moves through a full 180 degrees and the processing sketch is sending angles through the full 180 degrees to Arduino, the servo motor does not actually move through a full 180 degrees. It is not uncommon for low cost servo motors to respond with movements through only about 165 of the full 180 degrees.