Adrian Glasser – Land of Iron volunteer
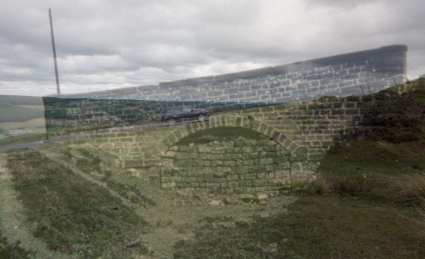
Time Sliders (the subject matter of this blog) allow horizontal scroll-bar controlled transitioning between aligned old and new images of the same subject. These were inspired by Tom Mutton and developed for the Land of Iron project.
This page details the minimum requirements to run a simple Time Slider from a computer or on a web page. Time Sliders are controlled by a little JavaScript program that runs to allow the Time Slider to work. The JavaScript can be run in a web browser both from a web site with all the files on the server or directly on a computer with all the files saved on the computer. Note that there is a small change required to the JavaScript to make a Time Slider work on a computer versus having it work on a web site.
It is straightforward to establish a single Time Slider on a web page, but somewhat more difficult to set up more than one on a single web page. For this reason, it is best to have a separate web page for each Time Slider. The reason for this is that the Time Slider uses a JavaScript to run. If there is only one JavaScript running on each web page, that is far easier to manage.
All the information needed to set up a Time Slider is available to be seen and copied directly from the web page itself. When on the Time Slider web page, just right-click with your mouse on the web page background (not on the Time Slider image itself) and from the pop-up menu that appears (at least on Google Chrome and Internet Explorer), select the 'View page source' or the 'View source' option. This lets you see the contents of the .html file.
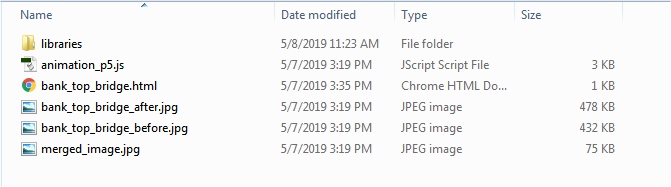
In the .html file, you will see two lines of html that refer to two JavaScript files, 'p5.js' and 'animation_p5.js'.
  <script type="text/javascript" src="libraries/p5.js" script language="javascript"></script>
  <script type="text/javascript" src="animation_p5.js" language="javascript"></script>
The 'p5.js' file is the JavaScript library that allows JavaScript commands to be executed. I have chosen to put that file in a separate 'libraries' sub-folder, that is why the file name is preceded by 'libraries/' - that is the path to the libraries folder. The 'p5.js' file can reside anywhere, so long as the path to the file is correct so the html file knows where to find it. Be sure that the library file is saved with the filename 'p5.js' in the 'libraries' folder. The second file is 'animation_p5.js'. This is the JavaScript file that runs the Time Slider. That file resides in the same folder as the .html file. If you click on the hyperlink to the 'animation_p5.js' file, you will see the contents of the JavaScript file. This is simply a text file. When viewing the JavaScript file on the browser, a right-click will open a menu which has a 'Save as...' option. Selecting that menu option will allow the 'animation_ps.js' file to be saved to the hard drive with the same original file name. On the 11th and 12th lines of the 'animation_p5.js' file (counting blank lines as well), you will see two calls to the loadImage() function.
  Ia = loadImage('bank_top_bridge_after.jpg');
  Ib = loadImage('bank_top_bridge_before.jpg');
These two 'loadImage()' function calls load the two images 'bank_top_bridge_after.jpg' and 'bank_top_bridge_before.jpg' into two variables named 'Ia' and 'Ib'. The two image file names in the JavaScript should be exactly the same as your image file names, so edit the 'animation_p5.js' file in a text editor if necessary. The two image files should reside in the same folder as the 'animation_p5.js' file. They don't absolutely have to be in the same folder, but if they don't reside in the same folder, then the path names will have to be included as well in the loadImage() function calls (for example: 'different_path_name/filename.jpg'). It is easier to have the image files in the same folder as the JavaScript file. After these two lines of the JavaScript are executed, the rest of the code can use the images stored in the two variables Ia and Ib. These two images are the two image files required for the Time Slider.
The two image files must both be exactly the same pixel dimensions in width and height as each other. In the case of this Time Slider example, the two images dimensions are width = 1060 and height = 645 pixels. It is a good idea to keep these two image files 'small' in size. It takes a lot of bandwidth for a browser to load images and it can take more time to load larger images. There is no real benefit to having larger image file sizes. The image files for this Time Slider are about 450KB in size. That is sufficient.
Also, it is necessary that the 'animation_p5.js' file uses exactly the same image dimensions as your image files. The 'canvas' on which the JavaScript runs should have exactly the same dimensions as your files. If necessary, edit the following width and height values so that the three instances that relate to the width and height are the same as the width and height values of your images.
  // uncomment the next line for running this on a computer
  //createCanvas(1060, 645);

  // uncomment the next two lines for running this on a web page
  var canvas  = createCanvas(1060, 645);
  canvas.parent("sketch");

  cWidth = 1060;
  cHeight = 645;
There is only one other file in the Time Slider folder. That file is called 'merged_image.jpg'. This file is used by the parent .html file to show a small image (the icon) that is the hyperlink to the Time Slider. This image is not actually used for the Time Slider itself, or in the .html page that displays the Time Slider. It is simply kept in this folder for convenience because it is the image that is associated with this Time Slider.
Here below is the bare bones .html code needed to run a Time Slider. Make sure your Time Slider JavaScript file is named 'animation_p5.js' and that your JavaScript library file is named 'p5.js' and is located in the 'libraries' sub-folder, or edit the code below to reflect the correct path names and file names to both of these files. You can copy this html code directly below and paste it into a text editor and then save it with an appropriate filename (use underscores rather than spaces in the file name if necessary) with a .html extension. This .html file should be saved in the same folder as the image files and the 'animation_p5.js' file.
<html>
  <head>
    <script src="libraries\p5.js"></script>
    <script src="animation_p5.js"></script>
  </head>
  <body>
  </body>
</html>
Web Site versus Computer
To have a Time Slider run from a computer (rather than form a web site), a part of the 'animation_p5.js' file should be edited to what is shown below. A tiny tutorial on JavaScript programming is required here. Any line in the JavaScript that is preceded by the double backslash '//' means that this line of code is either a comment or it is a line of code that has been 'commented out'. This means that it is ignored and not executed. There are a couple of lines that are actual comments and there are some lines of code that need to be either uncommented or commented out to work correctly on a computer versus on a web site. The actual comments explain which lines need to be uncommented in which circumstances. The code below is formatted to run on a computer, versus on a web site. When changing the code, be sure to not only uncomment the appropriate lines, but also to comment out the inappropriate lines.
  // uncomment the next line for running this on a computer
  createCanvas(1060, 645);

  // uncomment the next two lines for running this on a web page
  //var canvas  = createCanvas(1060, 645);
  //canvas.parent("sketch");

  cWidth = 1060;
  cHeight = 645;
Also, note that Google Chrome does not allow Time Sliders to be run locally on a computer. This is because Chrome has an in-built security feature that prevents it from loading image files from the same location as the JavaScript. There are work arounds, including posting the image files to a web server and having the JavaScript load the images from the server, but that is not appropriate if you want to run the Time Sliders only from a computer. The work-around is to use a different web browser. Internet Explorer does allow Time Sliders to work locally. If Internet Explorer is not set to be the default browser on your computer, you can open the .html file that runs the Time Sliders in Internet Explorer by right-clicking on the .html file and from the menu option that appears, select 'Open with...' and then choose Internet Explorer. When Internet Explorer opens, it will have a message at the bottom of the screen saying 'Allow blocked content'. Select 'Yes' and the Time Slider will open and run.
If you wish to establish a Time Slider on a web site, you will need access to a web server and you will need a program to transfer (or FTP) the files over to the server. All that is required is that the files for the Time Slider on your computer and the folder structure used for the Time Slider be transferred to the server. The 'animation_p5.js' needs to be edited as explained above to run on a web site (as opposed to running on a computer). With that and an apprioriate URL to the Time Slider .html file, it should run from the web page.
Happy Time Sliding!
A Bare Bones Time Slider
Bank Top Bridge